 "
"
Team:SUSTC-Shenzhen/Notebook/CRISPR/Plasmid-amplification-II-for-plasmid-pX330-EGFP
From 2014.igem.org
Notebook
Elements of the endeavor.
Plasmid amplification II for pX330 & EGFP & verifications by electrophoresis
2014/7/18 To perform plasmid purification for pX330 & EGFP and verifications by electrophoresisMaterials
- Plasmid purification
- E. coli D-H5a carried plasmid (pX330, EGFP)
- Plasmid purification kit (TINAprep Rapid Mini Plasmid Kit)
- Centrifuge machine
- centrifuge tube 12*tubes
- Ice box
- Electrophoresis
- DNA size standard (Marker)
- Loading dye solution (6×)
- Agarose
- TAE buffer (Tris-acetate-EDTA, 40mM Tris, 20mM acetic acid and 1mM EDTA-pH8.0 )
- GelRed (10000×)
- Horizontal Electrophoresis System
- UV Gel Imager
Procedures
Plasmid purification
- Preparation of Cells
- Inoculate 2 ml of rich medium (LB) containing the appropriate antibiotic (Amp, Kana) with a single colony of transformed bacteria. Incubate #:overnight 16 hours, 37°C
- Pour 2mL of broth into a centrifuge tube, 11000 rpm, 1 min
- Remove the medium completely, add 150μL P1 buffer, resuspend, votex.
- add 150μL P2 buffer, up and down gently 6~8 times; till it turn purple and clear
- Add 350μL P5, immediately invert up and down 10~12 times; till it turn yellow and clear and appear flocks. 11000rpm, 2 min.
- Transfer the supernatant into absorption column CP3, DO NOT carry the precipitate. 11000rpm, 1 min. Discard the liquid waste.
- Add 300μL PWT buffer, 11000rpm, 1min. Discard the liquid waste.
- Centrifuge again at 11000 rpm 1 min at 4°C. Discard the liquid waste.
- Put the absorption column CP3 into a new centrifuge tube, add 70L TB buffer, 11000rpm, 1min.
- Store in ice box for afternoon’s experiment
Electrophoresis
- Pour an agarose gel (including 1× GelRed) and cover it with TAE buffer.
- Pipette 1μL drops of the loading dye solution onto a piece of plastic wrap (one for each DNA sample)
- Pipette 5μL of each DNA sample into one of the drops of loading dye. Mix by pipetting up and down and carefully load into a well of the agarose gel.
- Pipette 5μL of a solution containing a DNA size standard into an empty well of the gel.
- Place the lid on the gel box and turn on the power supply to 126 volts.
- After the tracking dye has migrated half to two thirds of the way through the gel, turn off the power, remove the gel from the gel box and place in the UV Gel Imager. Observe the gel through the computer.
- Finally, store the plasmids in -20oC
Result
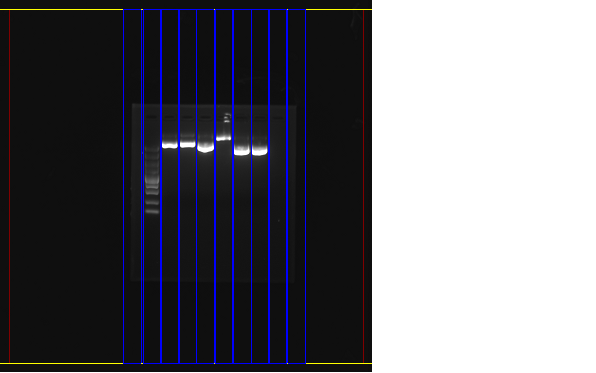 1: Marker 2: pX330 1 3: pX330 2 4: EGFP 1 5: EGFP 2 6: piggybac 1 7: piggybac 2
From the picture, we can see that:
Plasmid pX330: Monoclone 1, 2 of plasmid pX330 have amplified the plasmid successfully.
Plasmid EGFP: Monoclone 1 of plasmid EGFP have amplified the plasmid successfully, while Monoclone 2 of plasmid EGFP gave us a band far behind its supposed position, which meant the failure of amplification of this plasmid.
Plasmid piggyback: Monoclone 1, 2 of plasmid piggybac have amplified the plasmid successfully.